🛠 Throughout the tutorial, whenever you’re supposed to do something you will see a 🛠
See the video tutorial 📺
🛠 Install the MyST Markdown CLI
🛠 Install node (https://nodejs.org), see Installing NodeJS:
node -v
>> v20.4.0
🛠 Then install mystmd:
pip install mystmd🛠 Install node (https://nodejs.org), or through conda (see Installing NodeJS):
# Visit https://nodejs.org or:
conda install -c conda-forge 'nodejs>=20,<21'
Then install mystmd:
conda install mystmd -c conda-forge🛠 Install node (https://nodejs.org), see Installing NodeJS
node -v
>> v20.4.0
🛠 Install mystmd using npm, yarn or pnpm:
npm install -g mystmdSee the first quickstart tutorial for installation walk-through and installation prerequisites.
🛠 Download quickstart content
We are going to download an example project that includes a few simple markdown files and some Jupyter Notebooks.
Our goal will be to try out some of the main features of myst, improve the structure of the document, learn the basics of MyST Markdown for figures, citations, and cross-references, and export to a Word document, PDF and .
🛠 Download the example content, and navigate into the folder:
git clone https://github.com/executablebooks/mystmd-quickstart.git
cd mystmd-quickstart
🛠 Create and edit a MyST Website (optional)
In the previous tutorial we ran myst init, installed the default book-theme template for the website, and improved the style of the website.
Get up and running on your local computer 👩💻, create a local website 🌎, and edit elements of the theme to improve the website style 🎨.
To start this tutorial directly, when you run myst the first time, the install will take a little longer to install the book-theme, otherwise you should be good to go!
Start MyST 🚀
From the previous tutorial, you should already have created a myst.yml configuration file that is required to render your project. If you have not done that tutorial, type myst and follow the directions to start the server, otherwise:
🛠 Run myst start
If this is the first time you have run myst start, the theme will be installed (takes 15-30 seconds), and then bring up a local web-server that shows you a live preview of your documents as you are writing them! Every time you save a few milliseconds later the server will update.
📖 Built README.md in 33 ms.
📖 Built 01-paper.md in 30 ms.
📖 Built 02-notebook.ipynb in 6.94 ms.
📚 Built 3 pages for myst in 76 ms.

      ✨✨✨  Starting Book Theme  ✨✨✨

⚡️ Compiled in 510ms.

🔌 Server started on port 3000!  🥳 🎉

      👉  http://localhost:3000  👈
🛠 Open your web browser to http://localhost:3000[1]
To fully explore myst start see the first quickstart tutorial on Working with MyST Websites.
In this quickstart tutorial we will focus on creating printed documents! 📑
Use MyST Markdown! 🎉
Next we will improve the contents of the 01-paper.md, including the frontmatter, creating a “part” for the abstract, adding citations, figures, and cross-references.
Improve the frontmatter
🛠 Open 01-paper.md in a text editor
The start of the file includes information about the title, subtitle, author, affiliations and license. Unfortunately, this way of including this information is not easily machine-readable[2], and focuses more on style/typography than on metadata.
# How to MyST, without being mystified 🧙

A tutorial to evolve markdown documents and notebooks into structured data

**Authors:** Rowan Cockett <sup>1,2</sup> \
**Affiliations:** <sup>1</sup> Executable Books, <sup>2</sup> Curvenote \
**License:** CC-BY
This will produce a document that looks like:
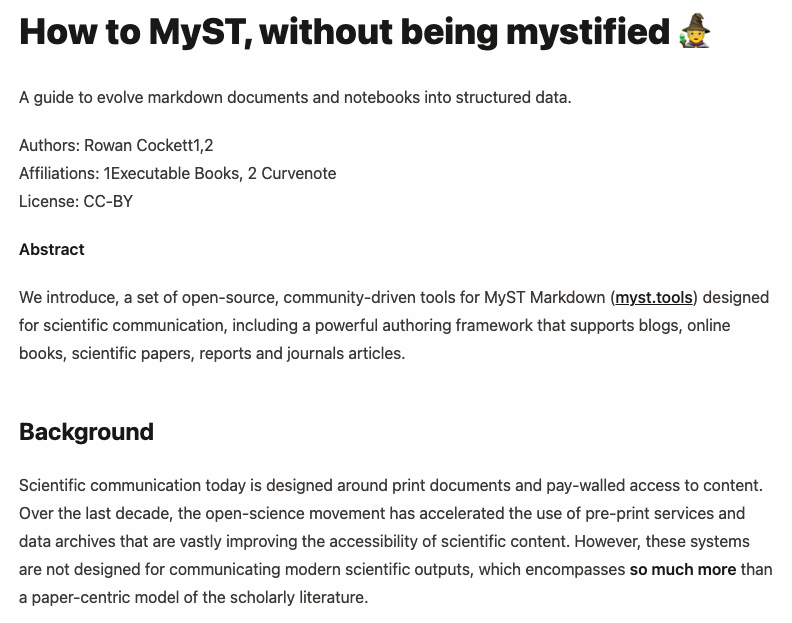
Figure 1:The myst theme for the 01-paper.md page using inline document and author information.
🛠 In 01-paper.md: Change the page frontmatter into a yaml block of data:
---
title: How to MyST, without being mystified 🧙
subject: Tutorial
subtitle: Evolve your markdown documents into structured data
short_title: How to MyST
authors:
  - name: Rowan Cockett
    affiliations:
      - Executable Books
      - Curvenote
    orcid: 0000-0002-7859-8394
    email: rowan@curvenote.com
license: CC-BY-4.0
keywords: myst, markdown, open-science
---
In this case, we are also adding additional metadata like an ORCID, as well as ensuring the license is an SPDX compatible code.
Once these are added, the myst theme (in this case the book-theme template) can make it look pretty, this can also be customized by other themes, including and Microsoft Word templates!
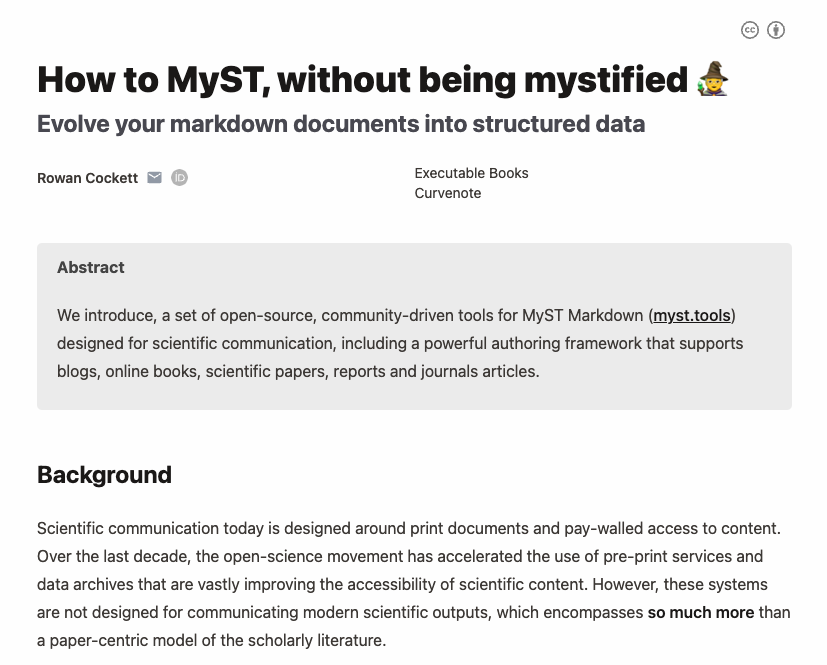
Figure 2:The myst theme for the 01-paper.md page after the frontmatter changes are added. Compare this to what it looked like before in Figure 1. The structure of the HTML page has also been improved, including meta tags that are available to search engines and other programmatic indexers.
Add an abstract part
We will also add metadata about the “parts” of our document, for example, the abstract.
This will be important when we export to PDF and also visually changes the book-theme.
🛠 In 01-paper.md: move the abstract into the frontmatter using a multiline YAML syntax abstract: |
1 2 3 4 5 6--- title: How to MyST, without being mystified 🧙 ... abstract: | We introduce, a set of open-source, community-driven ... ---
You can make other parts, like data_availability or acknowledgments or keypoints, templates will treat these differently and may require specific parts to fully render. See document parts for additional information.
Add a citation
🛠 In 01-paper.md: find the text citation for Bourne et al., 2012 (shown in red below), and change it to a doi based citation, as shown in green below:
- ... follow the FORCE11 recommendations (Bourne _et al._, 2012). Specifically:
+ ... follow the FORCE11 recommendations [](doi:10.4230/DAGMAN.1.1.41). Specifically:

1. rethink the unit and form of scholarly publication;
2. develop tools and technologies to better support the scholarly lifecycle; and
3. add data, software, and workflows as first-class research objects.
This will result in correct rendering of the citation (such as Bourne et al. (2012)), and automatic insertion into the references section.
🛠 In 01-paper.md: find the text citation for Head et al. (2021), and change it to:
[](doi:10.1145/3411764.3445648)If you have replaced both of these citations, you can now safely remove the text-only, poorly formatted references section, as that is now auto generated for you!
🛠 In 01-paper.md: Remove the ## References section with the two references (leave the links!)
This will have created a References section at the bottom of the page automatically!

Figure 3:The references are shown automatically at the bottom of the page, and linked to the correct DOI source!
Add a figure directive
🛠 In 01-paper.md: replace the image and paragraph with a figure directive.
Replace:

**Figure 1**: Citations are rendered with a popup directly inline.with:
:::{figure} ./images/citations.png
:label: citations
Citations are rendered with a popup directly inline.
:::
🛠 If you are up for it, in 01-paper.md replace the rest of the images with figure directives!
Add a cross-reference
🛠 In 01-paper.md: replace the text “Figure 1” with a local link to the figure
- ... (see Figure 1).
+ ... (see [](#citations)).
The “Figure 1” text will be automatically filled in, for example, Figure 4.
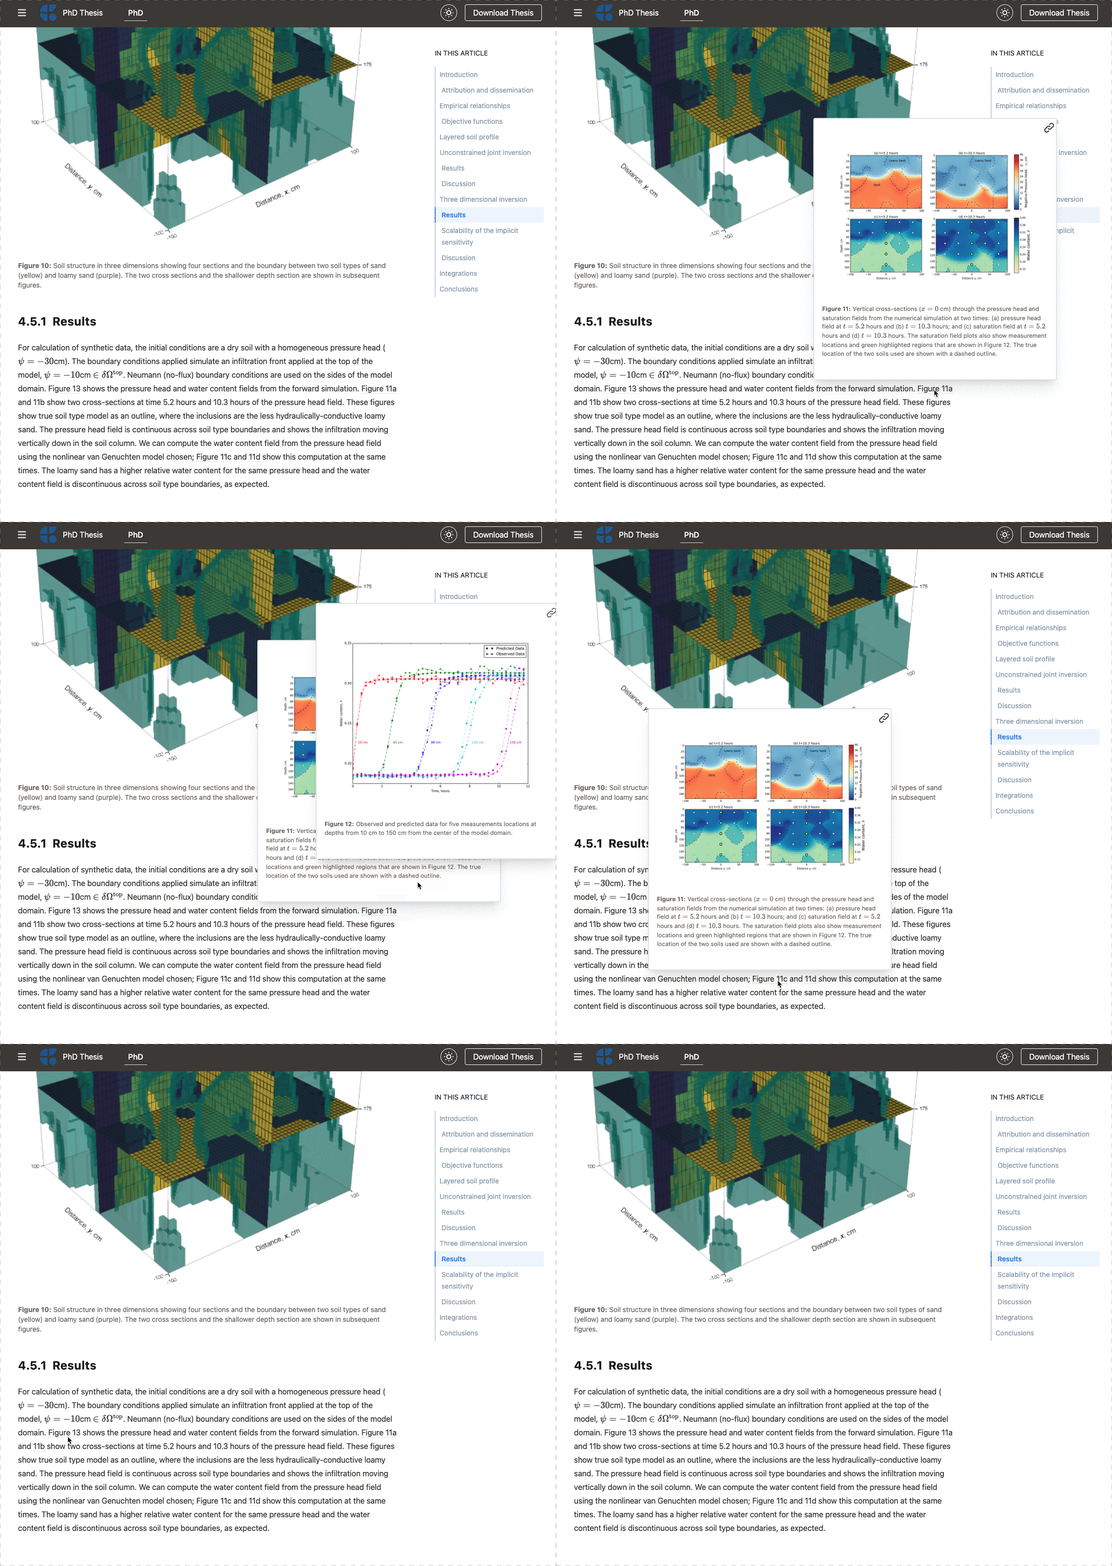
Figure 4:When you cross-reference content in MyST, they become hover-references, allowing you to stay in context when you are reading. Checkout the phd thesis written in MyST, with demos of references to math, figures, tables, code, and equations.
Export Documents 📜
Next we will start to add information to be able to export to both PDF and Word documents!
Exporting to Word & PDF destroys metadata! 😵💫
MyST has excellent support for many different journal types and pre-prints. See Scientific PDFs for a list of the templates! We have put years of work into making this great and work for you! 👍
However, when you export to or Microsoft Word, these programs are designed for static, print documents. , for example, is heavily focused on typographic style rather than preserving metadata -- how the page looks is more important than the data.
These choices lead to many challenges of post-processing PDF documents to get out the actual data:
content, authors, citations, cross-references, equations.
This data is critically important for modern, networked science, and powering meta-research of scientific fields!
MyST can also export to other formats directly, such as JATS (Journal Article Tag Suite), which is what most scientific documents end up as when they are published.
By writing in MyST, you can export directly to these formats. Using MyST will also allow you to support interactive, computational media -- things that will never make it to the PDF!!
Help support the transition to FAIR[3], open science by preferring web-based formats and publishing your own work on the web.
Microsoft Word Documents
🛠 In the 01-paper.md add export: docx to the existing frontmatter section:
---
export: docx
---
🛠 Run myst build --docx
myst build --docxThe export process will run for any known files with docx specified in the export frontmatter. An equivalent command to export only this specific file is:myst build 01-paper.md
📬 Performing exports:
   01-paper.md -> _build/exports/paper.docx
📖 Built 01-paper.md in 247 ms.
🔍 Querying template metadata from https://api.mystmd.org/templates/docx/myst/default
🐕 Fetching template from https://github.com/myst-templates/docx_default/archive/refs/heads/main.zip
💾 Saved template to path _build/templates/docx/myst/default
📄 Exported DOCX in 166 ms, copying to _build/exports/paper.docx
In this case, the default word template was used, resulting in a document formatted like this:
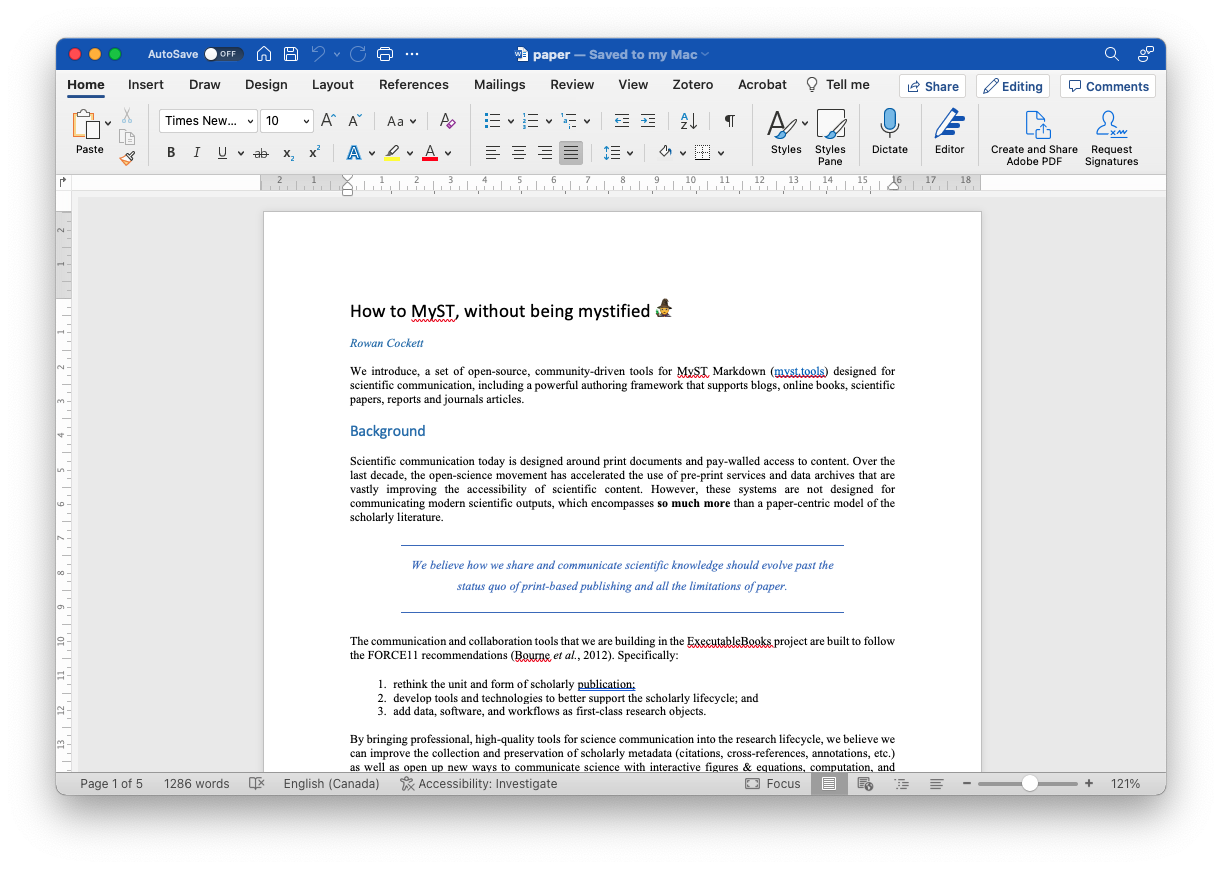
Figure 5:Exporting your article to docx using myst export --docx.
Next we will see how to change the template as well as how to add additional exports when working with and PDF!
Exporting to PDF
To export to PDF, MyST currently requires to be installed. See Scientific PDFs for more information about how to install .
First, we need to decide which template to export to, for this, we will use the myst templates command, and for example list all the two-column, PDF templates available.
🛠 List all two column PDF templates with:myst templates list --pdf --tag two-column
arXiv (Two Column)       arxiv_two_column
Description: A two column arXiv compatible template
Tags: paper, two-column, preprint, arxiv, bioarxiv, eartharxiv

Volcanica                volcanica
Description: A template for submissions to the Volcanica journal
Tags: paper, journal, two-column, geoscience, earthscience
🛠 Then, list the specific information needed for a template:myst templates list volcanica --pdf
Volcanica                volcanica
ID: tex/myst/volcanica
Version: 1.0.0
Authors: Volcanica
Description: A template for submissions to the Volcanica journal
Tags: paper, journal, two-column, geoscience, earthscience

Parts:
abstract (required) - No description
acknowledgments - No description
author_contributions - No description
data_availability - Links to data repositories, and/or a statement...

Options:
article_type (choice) - Details about different article types...
In addition basic information on the template, the template’s specific “parts” and “options” are shown. Some of these may be marked as (required) and be essential for the building the document correctly with the template.
🛠 In 01-paper.md create an exports list with docx and pdf formats.
---
exports:
  - format: docx
  - format: pdf
    template: volcanica
    article_type: Report
---
We have added a second export target for pdf and included additional information to specify the template, as well as set the article_type option, which is information we discovered when listing the template above! We also saw this template supports a number of “parts” including a required abstract part, but as we already added an abstract part earlier in this tutorial, we are good to go.
You can now build the exports with the following command:
🛠 Run myst build 01-paper.md
📬 Performing exports:
   01-paper.md -> _build/exports/paper.docx
   01-paper.md -> _build/exports/paper.pdf
🌠 Converting 3 GIF images to PNG using imagemagick
📖 Built 01-paper.md in 257 ms.
📄 Exported DOCX in 205 ms, copying to _build/exports/paper.docx
📑 Exported TeX in 5.11 ms, copying to _build/temp/myst8BVu1k/paper.tex
🖨 Rendering PDF to _build/temp/mystvUibhD/paper.pdf
📄 Exported PDF in 9.3 s, copying to _build/exports/paper.pdf
Install imagemagick to convert GIFs
imagemagick to convert GIFsAnimated images are not well supported by the PDF format, and MyST converts the first frame to a static image.
To do the conversion you need to download and install imagemagick, for example:
# on Mac OS
brew install imagemagick
# on Ubuntu
apt install imagemagick
Emojis aren’t rendered in PDF 😭
We are tracking emoji support, if you think this feature is important and want to help out, we would love your help. 💚 🦺 🪚 🧱 🏗 🚀
In the screenshot below we have removed the 🧙 emoji, which ... also works.
You can now see your two-column PDF in a submission ready format for the journal (check the _build/exports folder). It is very easy to change the template to a different format -- just change the template: field in the frontmatter!
Notice also that the PDF has converted dynamic images to a static alternative (e.g. GIFs are now PNGs).
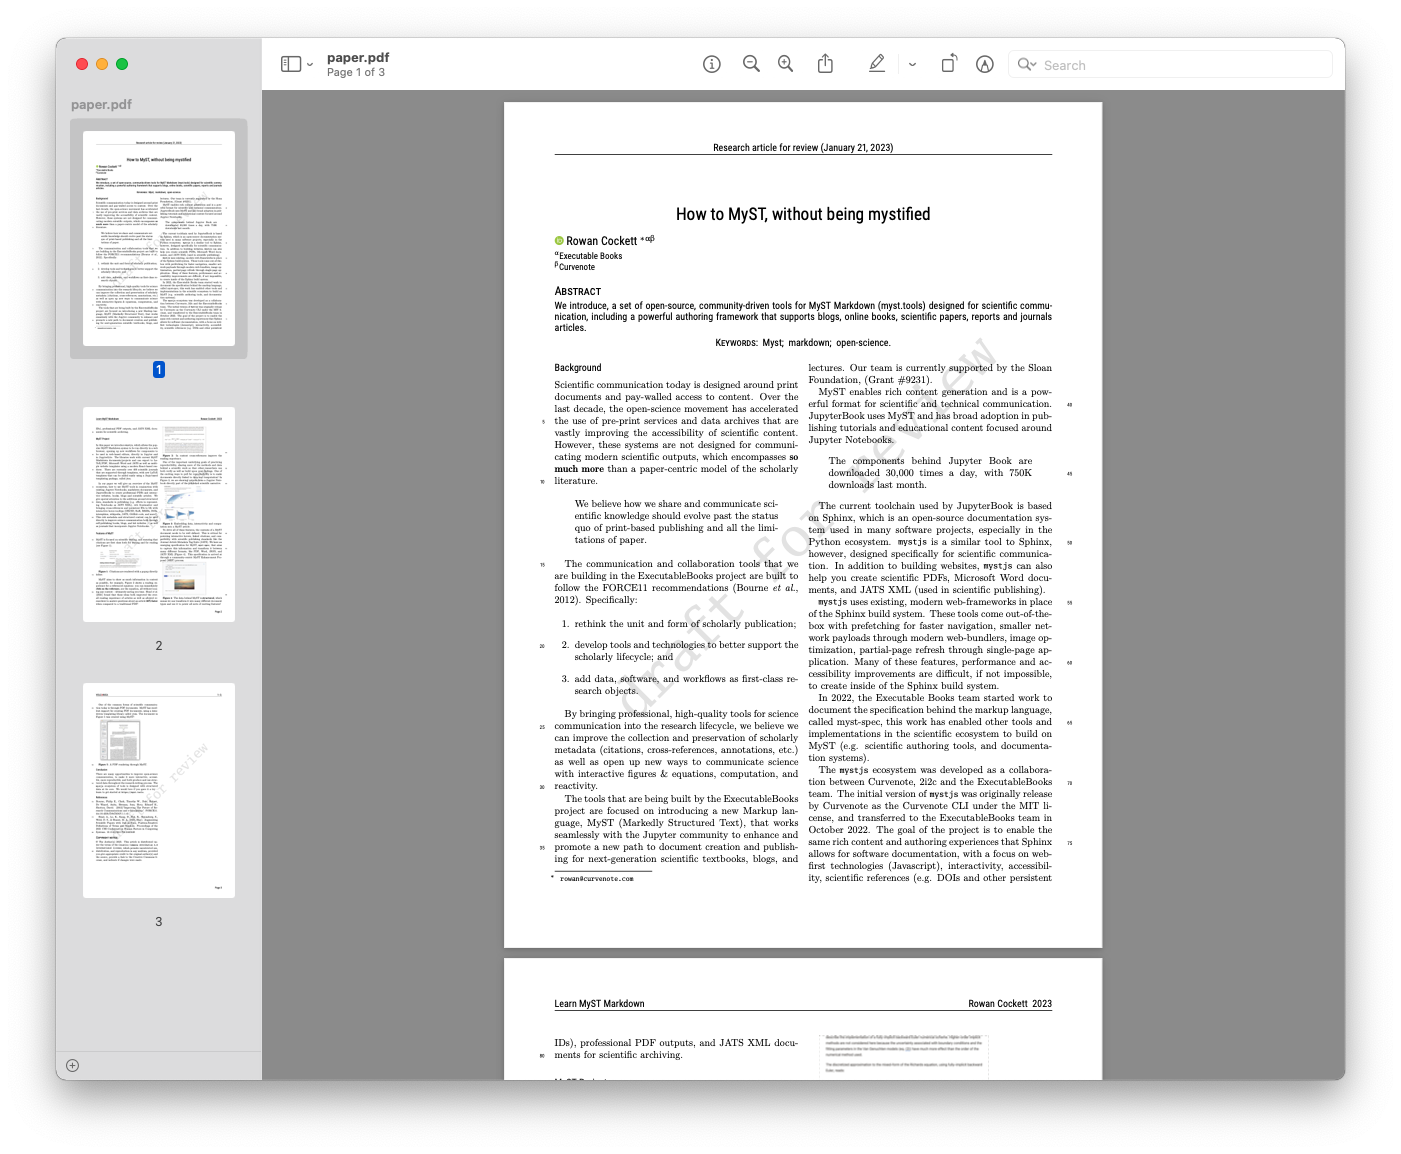
Figure 6:Exporting the article to a two column PDF with appropriate metadata to submit to a Journal.
Exporting to 
If you would like to see the source, you can look in the _build/temp directory, or you can update the
🛠 In 01-paper.md: replace format: pdf with format: tex. Specify the output location as a zip file.
1 2 3 4 5 6 7 8--- exports: - format: docx - format: tex template: volcanica article_type: Report output: arxiv.zip ---
🛠 Run myst build 01-paper.md
You should see these two additional lines:
📑 Exported TeX in 4.87 ms, copying to _build/exports/paper_tex/paper.tex
🤐 Zipping tex outputs to arxiv.zip
Without specifying the output: location, this will copy the unzipped contents into the _build/exports folder along with all other exports.
Creating a zip file can be helpful when directly submitted to the arXiv or a journal!
Exporting to Markdown
🛠 In 01-paper.md create an exports list with docx, pdf and md formats.
---
exports:
  - format: docx
  - format: pdf
    template: volcanica
    article_type: Report
  - format: md
---
You can now build the exports with the following command:
🛠 Run myst build 01-paper.md
📬 Performing exports:
   01-paper.md -> _build/exports/paper.docx
   01-paper.md -> _build/exports/paper.pdf
   01-paper.md -> _build/exports/paper.md
🌠 Converting 3 GIF images to PNG using imagemagick
📖 Built 01-paper.md in 257 ms.
📄 Exported DOCX in 205 ms, copying to _build/exports/paper.docx
📑 Exported TeX in 5.11 ms, copying to _build/temp/myst8BVu1k/paper.tex
🖨 Rendering PDF to _build/temp/mystvUibhD/paper.pdf
📄 Exported PDF in 9.3 s, copying to _build/exports/paper.pdf
📄 Exported MD in 205 ms, copying to _build/exports/paper.md
Conclusion 🥳
That’s it for this quickstart tutorial!!
As next steps for specifically working with documents, we recommend looking at:
A high-level of all of the syntax available to your for working with the MyST Markdown language.
To learn more about the specifics of creating MyST websites:
Create a website like this one.
- Bourne, P. E., Clark, T. W., Dale, R., de Waard, A., Herman, I., Hovy, E. H., & Shotton, D. (2012). Improving The Future of Research Communications and e-Scholarship (Dagstuhl Perspectives Workshop 11331). 10.4230/DAGMAN.1.1.41